The other day when I wrote a review on a program that GAOTD (Giveaway of the Day) was giving away, I got over 1,000 views of my blog, so I thought that I would try it again.
Today GAOTD is giving away a program called Scanitto Pro. I have never heard of this before but I thought I would give it a try to see how it compares to HP Solution Center, which is what I currently use. The following will walk you through, step-by-step, on how to install and scan something using this program.
JUMP TO:
INSTALLATION
SETTING YOUR SETTINGS
USING THE PROGRAM
SCANNING
VERDICT
First thing you need to do is download Scanitto Pro from http://www.giveawayoftheday.com/scanittopro/.
It will download as a .zip file, so you may have to unzip it before you can install it. Either way, just browse into the zipped (or unzipped) folder and double-click "Setup.exe" (if you do not have file extensions showing, it will just be "Setup") to open the installer. If you run Windows Vista, it is preferred that you run the file as an administrator by right-clicking and selecting "Run as administrator." If that option does not appear, make sure to unzip the file.
If a popup message pops up after you try to open the installer, just select yes or allow. The installer first asks you to select your language, and if you are reading this, I suggest leaving it as the default: English. Click next, then select "I accept the agreement" then click next again, then next again, then next one more time. Now it asks you if you want to create a start menu folder, if you do want that, select that option. Now click next once more, then make sure the options you want are selected. Then one last time click next. Then click install. Once it installs, it asks if you want to run it. You don't have to, but I will. Then click finish. Well that was an exciting and fun time clicking next, wouldn't you agree?
Now that it is finished installing, if you did not select to open it, continue reading this. If you did select to open it, read "Setting Your Settings" right below this, then come back to this. Now, if you are coming back to this, close the program. If not, then it should not have been open in the first place. You now need to go back to the folder that the setup file was in and run the activation file. Open it the same way you opened the setup file, so if you are a Vista user, open it as an administrator. Once you have activated the program, it should no longer be in trial mode.
When I tried to do this my first time, my external hard drive started revving up and tweaking out then after a couple minutes a message finally asked me to confirm running the file. I clicked yes, then when I could, I unplugged my external hard drive. Then a bit after confirming to run the file, Norton SONAR would not let me run the activation file because it is a threat to my system. I tried running the file a couple different times in a couple different ways and continued to get the same result. Therefore I have decided it could very well be a threat and have chosen to not keep the program (I will continue this tutorial though).
If you have already set your settings, skip to Using the Program.
When you first open the program, you should see a small "Settings" window in front of a larger window which is the actual program, similar to the following screenshot. I will select the options I want to use in this window and tell you what they are and why I chose them. You can use whatever settings you like though.
In the "JPED & PDF Settings" tab I moved the slider to 100% because I just prefer images to be as high quality as possible. However, I do believe this makes the file take up more space (probably not by much though, but I am not an expert on this so don't take my word for it).
In the "TIFF Settings" tab, I selected "No Compression," again for the reason that I want the picture or whatever I am scanning to be the best possible quality. These files can get pretty big though, so if you are worried about space on your computer, I suggest not even saving anything as a TIFF file.
Finally, in the "Advanced" tab I selected all of the options, mostly because I don't like when programs hide stuff from me and I hate error messages.
Once you have finished setting your settings, click okay.

Today GAOTD is giving away a program called Scanitto Pro. I have never heard of this before but I thought I would give it a try to see how it compares to HP Solution Center, which is what I currently use. The following will walk you through, step-by-step, on how to install and scan something using this program.
JUMP TO:
INSTALLATION
SETTING YOUR SETTINGS
USING THE PROGRAM
SCANNING
VERDICT
INSTALLATION
First thing you need to do is download Scanitto Pro from http://www.giveawayoftheday.com/scanittopro/.
It will download as a .zip file, so you may have to unzip it before you can install it. Either way, just browse into the zipped (or unzipped) folder and double-click "Setup.exe" (if you do not have file extensions showing, it will just be "Setup") to open the installer. If you run Windows Vista, it is preferred that you run the file as an administrator by right-clicking and selecting "Run as administrator." If that option does not appear, make sure to unzip the file.
 |
| Double-click "Setup.exe" to open the installer |
Now that it is finished installing, if you did not select to open it, continue reading this. If you did select to open it, read "Setting Your Settings" right below this, then come back to this. Now, if you are coming back to this, close the program. If not, then it should not have been open in the first place. You now need to go back to the folder that the setup file was in and run the activation file. Open it the same way you opened the setup file, so if you are a Vista user, open it as an administrator. Once you have activated the program, it should no longer be in trial mode.
When I tried to do this my first time, my external hard drive started revving up and tweaking out then after a couple minutes a message finally asked me to confirm running the file. I clicked yes, then when I could, I unplugged my external hard drive. Then a bit after confirming to run the file, Norton SONAR would not let me run the activation file because it is a threat to my system. I tried running the file a couple different times in a couple different ways and continued to get the same result. Therefore I have decided it could very well be a threat and have chosen to not keep the program (I will continue this tutorial though).
If you have already set your settings, skip to Using the Program.
SETTING YOUR SETTINGS
When you first open the program, you should see a small "Settings" window in front of a larger window which is the actual program, similar to the following screenshot. I will select the options I want to use in this window and tell you what they are and why I chose them. You can use whatever settings you like though.
 |
| Screenshot of Scanitto Pro |
In the "General" tab, I chose to check for updates at startup because it is just easier than manually checking for updates. I also chose to save the scanner and image preferences because I will probably want the same ones every time. If left unchecked, I think it may bring this window up every time I open the program. I also left the "Skip blank pages" field unchecked, because sometimes I scan a blank page as a separator when I scan multiple page documents.
 |
| General Tab |
 |
| JPEG & PDF Settings Tab |
In the "TIFF Settings" tab, I selected "No Compression," again for the reason that I want the picture or whatever I am scanning to be the best possible quality. These files can get pretty big though, so if you are worried about space on your computer, I suggest not even saving anything as a TIFF file.
 |
| TIFF Settings Tab |
Finally, in the "Advanced" tab I selected all of the options, mostly because I don't like when programs hide stuff from me and I hate error messages.
 |
| Advanced Tab |
USING THE PROGRAM
When you first open the program, it can look very user-friendly, yet confusing at the same time. On the left side of the window are many options, but they are much simpler than they may appear.

First things first, start at the source. Basically just make sure that the name of your scanner is right there. Chances are if there is something already there, then that is the correct source. However, if you don't see anything there or in the drop-down menu, then you need to go out and buy a scanner or turn on the one you have.
The second thing in the column you can probably ignore, especially if you don't know what it is.
The third thing is the Mode; you can select your scan to come out in color (default), black & white, or grey.
The fourth thing is the resolution. You can choose between 75 and 2400 ppi. As I have stated before I like the best quality images possible, however, I also like my time. Therefore, I only set this to 600. The higher the resolution, the better the quality, but also the longer the scan.
The next three things, are probably better if left alone, however sometimes you may need to adjust the brightness and contrast, but I think the size should generally be left alone. You can always crop later if you need to.
Next is the file name. <#> means a sequence number, so if you have multiple scans, they will be named "1" "2" "3"... inserts the current date in YYYY-MM-DD format and inserts the current time in HH-MM-SS 24 hour format. Most people will probably just name their scans something like "scan_<####>" just for simplicity, but if there are not multiple items, probably just "scan" would suffice.
After that is the next sequence number. This will usually be 1 unless your scanning pages starting at, say, page 45 and you want to start numbering at 45 or something. That's the best example I can come up with.
Then is the file format. JPG and PDF are probably the most common. You can choose whichever one you want though. However, I would watch out for those TIFF files especially if your computer is running low on space.
The next thing is the destination, which is the folder the scanned file will be saved to. If your scanning a picture, you may want to save it to your pictures folder. Wherever you choose to save it to though, make sure you can access it and know how to get to it.
Finally when you have set all of those settings, you can click scan.
The scanning process can vary depending on what computer you are using, what scanner you have, and whether you already have another scanning program. Here is what happened for me.
When I pressed scan I was disappointed to see my regular scan program come up—the HP Solution Center one—but then I saw a message that said, "Image will be Re-Scanned," so I thought, "okay," and just clicked Finish.

After I clicked Finish another window popped up letting me know it was scanning and that the scan would be sent to Scanitto Pro.
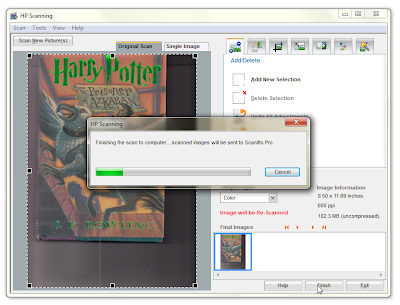 It took about a minute to scan at 600 ppi so it wasn't a long wait. When it finally finished though, I was a bit disappointed with the screen that came up:
 I was mostly disappointed because it had done all of the scanning in the other program, though I was grateful that I was able to set my own settings and ppi because I could never figure out how to do that in the other program. I also like the options to save all the images as a PDF, TIFF, or an editable text file.

I saved my image as a PDF file and here is a screenshot of that:

I also have the full JPG image of the scan which is still uploading right now. I am putting it on here so you can get a feel for what 600 ppi does.
EDIT: It is now finished uploading I think when it uploaded the picture shrunk because the original file is 5100 x 7014.

All in all, I think that this is a very good and well put together program. I don't really see how it does much more than what any other scanning program out there can do, but I really do love how one can set the ppi resolution. If I can ever get this program activated without my anti-virus being alarmed, I will keep it. However, because the activation file was flagged, I am still a bit wary about activating it even though I like the features.
The second thing in the column you can probably ignore, especially if you don't know what it is.
The third thing is the Mode; you can select your scan to come out in color (default), black & white, or grey.
The fourth thing is the resolution. You can choose between 75 and 2400 ppi. As I have stated before I like the best quality images possible, however, I also like my time. Therefore, I only set this to 600. The higher the resolution, the better the quality, but also the longer the scan.
The next three things, are probably better if left alone, however sometimes you may need to adjust the brightness and contrast, but I think the size should generally be left alone. You can always crop later if you need to.
Next is the file name. <#> means a sequence number, so if you have multiple scans, they will be named "1" "2" "3"...
After that is the next sequence number. This will usually be 1 unless your scanning pages starting at, say, page 45 and you want to start numbering at 45 or something. That's the best example I can come up with.
Then is the file format. JPG and PDF are probably the most common. You can choose whichever one you want though. However, I would watch out for those TIFF files especially if your computer is running low on space.
The next thing is the destination, which is the folder the scanned file will be saved to. If your scanning a picture, you may want to save it to your pictures folder. Wherever you choose to save it to though, make sure you can access it and know how to get to it.
Finally when you have set all of those settings, you can click scan.
SCANNING
The scanning process can vary depending on what computer you are using, what scanner you have, and whether you already have another scanning program. Here is what happened for me.
When I pressed scan I was disappointed to see my regular scan program come up—the HP Solution Center one—but then I saw a message that said, "Image will be Re-Scanned," so I thought, "okay," and just clicked Finish.

After I clicked Finish another window popped up letting me know it was scanning and that the scan would be sent to Scanitto Pro.


I saved my image as a PDF file and here is a screenshot of that:

I also have the full JPG image of the scan which is still uploading right now. I am putting it on here so you can get a feel for what 600 ppi does.
EDIT: It is now finished uploading I think when it uploaded the picture shrunk because the original file is 5100 x 7014.

VERDICT
All in all, I think that this is a very good and well put together program. I don't really see how it does much more than what any other scanning program out there can do, but I really do love how one can set the ppi resolution. If I can ever get this program activated without my anti-virus being alarmed, I will keep it. However, because the activation file was flagged, I am still a bit wary about activating it even though I like the features.


